Wednesday, May 30, 2012

Tofu Xpress Review

Comes with:
- a Marinating Lid
- an Instruction Booklet and Recipe Guide.
- 1 year limited warranty


As I was writing the chapter on Tofu for my upcoming cookbook on Silk Road inspired vegetarian cuisine, I decided it would be a good idea to include step by step instructions on how to press tofu. Tofu comes in a variety of textures from silken to extra firm and the firmer the tofu, the higher the fat content. In order for tofu to taste good, it needs to be pressed, drained and then marinated. The water content needs to be removed, so that the tofu can absorb the marinade.


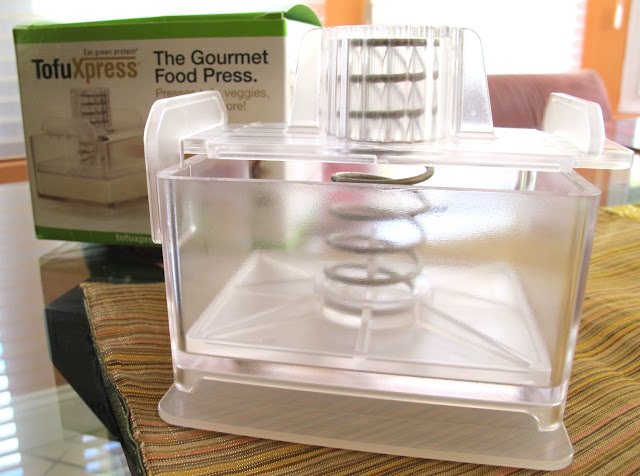
As I was researching the steps to pressing tofu, I came by a tool called Tofu XPress, which is designed to press tofu with out the hassle of setting up so many props to drain the water from tofu. Subsequently, I contacted Tofu XPress and asked them if I could try out this tool for my cookbook and that I would write a review on it.
I only use organic non-GMO tofu
Cut around the edges of the package to remove water content from the package and drain over sink
It's easy enough to slide the lid on the tofu press, however the spring sat slanted on the tofu.
After 30 minutes of pressing, look how much water got released. 
* Due to the spring sitting slanted on the tofu, one side got more pressed than the other.


After using the TofuXpress, I can say that it does remove water efficiently from tofu to change its texture and allows for significant marination to occur. The longer you press the tofu, the more water it will excrete. The pictures show a pressing of 30 minutes, which I was satisfied with, however I will look into why the spring was not sitting evenly on the tofu next time to make sure I don't press my tofu lopsided.


I am saying goodbye to using a lot of paper towels and the weight of books to drain my tofu and will be turning to Tofu XPress regularly to prepare tofu.

There is an optional Light Tension #2 Spring attachment for pressing cheeses, silken tofu, and yogurts, but I did not get a chance to use it. The tool converts into a marinating dish - however I did not use it, because I sliced up my tofu and this option took a lot of space.

Marinade for Orange Spiced Tofu

Here are more recipes on my blog using tofu that needs to be pressed:
Spicy Tofu & Asparagus Stir Fry
Cabbage Slaw in Peanut Sesame Dressing
Mixed Tofu & Vegetables in Lime Ginger Sauce
Orange Spiced Tofu

* Update on this post 5/30/12 *

Since I posted this review, Tofu XPress reached out to me to explain why the tofu got pressed slanted.
" If after inserting the assembled top into the base of the unit you notice the Press Plate (the part touching the brick of tofu) is not lying flush on the brick of tofu then remove the assembled top and press down on the corner of the tofu that is sticking up so the brick of tofu is even in height on all sides, then put back the assembled top in the base. The Press Plate should now be sitting flush on the brick of tofu."


Tuesday, May 8, 2012

Gluten Free Ginger Bread


About 20 years ago, I was a practicing Naturopathic doctor in Manhattan. The philosophy of naturopathy, is to feed the body the nutrients it needs to heal itself. By and part, this also means avoiding certain foods that may trigger the body to attack itself. I entered the field of natural medicine as a consequence of a debilitating ulcer. After seeing many gastroenterologists, who medicated meds that were not helping me feel any better,  I went to see a holistic practitioner.  Dr. Michael Wald- who now practices in Westchester guided me to avoid all wheat and dairy. After a couple of months on an elimination diet, I was on my way to healing my ulcer. I was fascinated by the outcome, and spent many hours in the NY Academy of Medicine researching medical documentation on how to cure an ulcer naturally.


In any event, and not to digress too much, that was the turning point in my life that led me to study naturopathy. Although, I was told by my MD's to avoid spices, ginger was my ally. Ginger has been a popular culinary spice and medicinal herb around the world for centuries, especially in Asia, India and the Middle East. It is used regularly to treat indigestion, gas and bloating, nausea, diarrhea, and irritable bowel syndrome. In fact, early references to ginger bread to treat an upset stomach has been documented from the 15th century in Sweden. Thereby this recipe....

At one time gingerbread was made with breadcrumbs and sweetened with honey, but as it made its way throughout the world it was adapted to meet the tastes of different cultures. And of course, I always love to morph a recipe to suit my culinary taste. That is why if you sample gingerbread in a country other than your own it may not look or taste as you expected. It can be a bread or a spicy sweet cake in a molded shaped. My version is gluten free- and now that you know a little about my history, you can undertand why all the recipes on this blog are gluten free. 

Akin to the original Middle Eastern recipes, English gingerbread is a dense, molasses-based, spice cake- which is the way I like it too. Some recipes add mustardpepperraisinsnutsapple, and other spices to the batter. If you want to sprinkle any of these into your version, I strongly encourage that you mix in the flavors you fancy.

This recipes utilizes the classic method for making gingerbread, which requires melting the butter in with the molasses, and sugar before adding the dry ingredients - in this case they are gluten free. To give it some extra kick I used two forms of ginger: ground, and candied to ensure a pronounced ginger flavor. A heavy dose of other classic gingerbread spices give the cake some more dimension. These methods and ingredients together create a gingerbread that is dark, dense, a little bit sticky, and outrageously flavorful.

Serves 10

Ingredients


1/2 cup light brown sugar
6 tablespoons vegan butter (Earth Balance)
1/2 cup molasses
7 tablespoons coconut milk
1 egg, beaten
1 cup Gluten Free oat flour
1/2 cup tapioca flour
1/2 cup sweet rice flour
pinch of salt
2 teaspoons ground ginger
1 teaspoon ground cinnamon
1 teaspoon baking powder
1/4 cup crystallized ginger (optional)

Directions

  1. Preheat the oven to 325F. Lightly grease and line a 13 x 4 x 4 inch loaf pan. Place the sugar, butter, and molasses in a sauce pan and heat gently until melted and blended, stirring occasionally. 
  2. Remove the pan from the heat, let cool slightly, then mix in the coconut milk and egg.
  3. Mix the flours, salt, spices and baking powder in a large bowl.
  4. Make a well in the center, pour in the liquid mixture and beat well.
  5. Add crystalized ginger and mix into the batter, if you desire a more pronounced ginger taste.
  6. Pour the mixture into the prepared pan and bake for 40 minutes, or until firm to the touch and lightly browned.
  7. Allow to cool in the pan for a few minutes, then turn out onto a wire rack to cool completely. Store in an airtight container or wrap in foil.

Related Posts Plugin for WordPress, Blogger...